A garage shoe rack has a harder job than an indoor organizer. It must handle mud, road salt, melting snow, damp concrete, temperature swings, vehicle exhaust, and heavy work boots. A rack that works well in a bedroom may swell, rust, or become unstable in a garage.
The right choice depends on your footwear, available wall and floor space, cleaning habits, and garage conditions. Most households will do well with a powder-coated steel rack that has open slats, raised feet,. And a removable drip tray.
If you wash your garage floor with a hose, a wall-mounted rack can be a better fit.
Quick Answer: Best Shoe Rack for a Garage
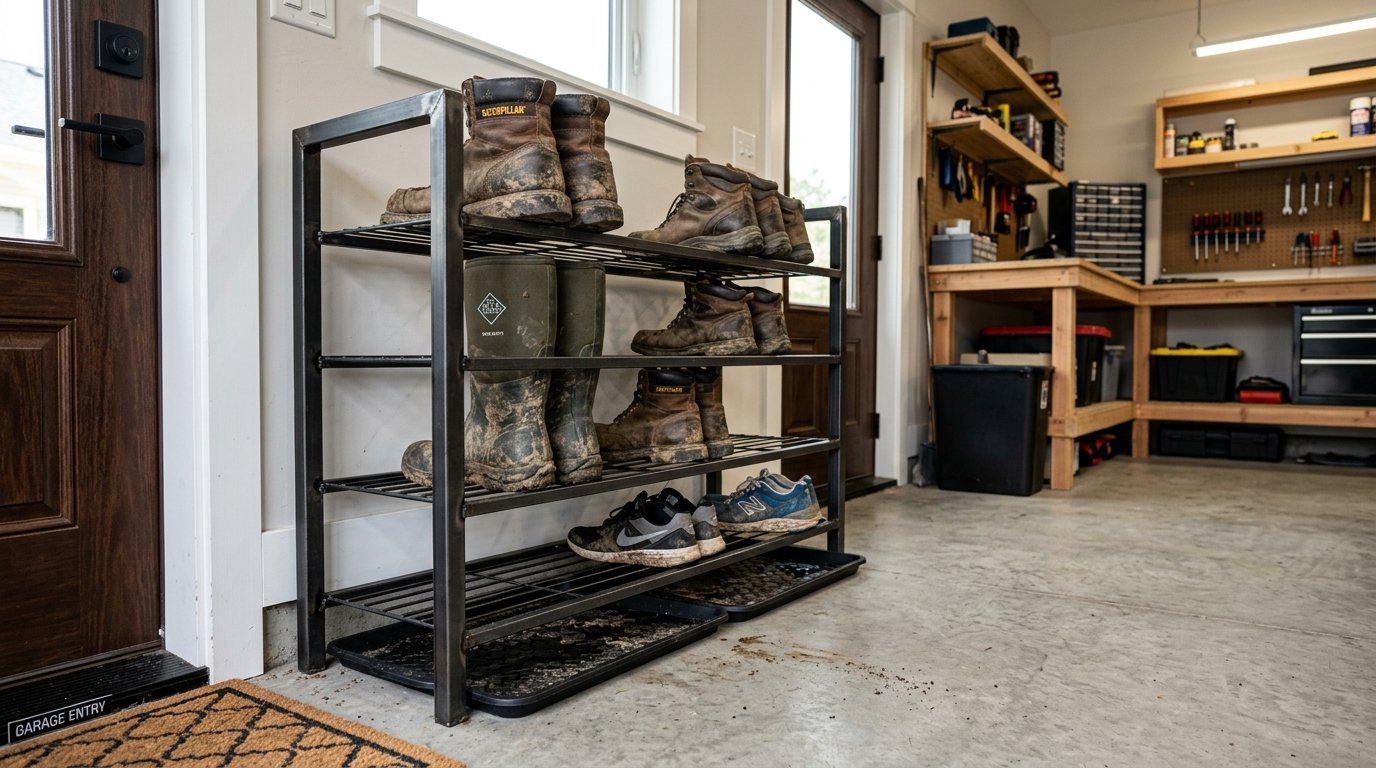
The best shoe rack for a garage uses powder-coated carbon steel with open wire slats and removable plastic drip trays to collect melting snow, road salt, and mud. Avoid particleboard or wood, which warp from cold slab condensation. Choose models with at least 14 to 16 inches of bottom tier clearance for tall muck boots, or wall-mounted floating racks that allow easy floor washdowns.
Key Takeaways
- Concrete Condensation Defense: racks off bare concrete slabs to prevent cold ground moisture from rotting shoe leather.
- 14-to-16 Inch Boot Clearance: Allocate deep vertical tier clearance on lower shelves for heavy insulated work boots and muck waders.
- Removable Mud Drip Trays: Slide-out plastic trays catch dripping slush and dirt so you can hose them clean outside.
- Inverted Drying Pegs: Inverted boot racks circulate ambient garage air into boot linings while preventing spiders from nesting inside.
Why Garage Conditions Matter
Garages have several problems that indoor rooms don’t. Humidity can rise when a wet vehicle enters the space. Snow and road salt drip from boots.
A cold concrete slab can stay below the air temperature, causing moisture to collect on surfaces. Dirt and exhaust residue can also settle on footwear and furniture.
Concrete absorbs and releases moisture. When warm, damp air meets a cold slab, water can condense near the floor. Shoes sitting directly on that surface may develop damp soles, mildew, or leather damage.
Raising the rack 2 to 4 inches helps air move beneath it and reduces direct contact with floor moisture.
A good garage rack also makes cleaning easier. Open shelves let grit fall into a tray or onto a mat instead of collecting around enclosed compartments. You can remove a plastic tray, hose it outside, and return it after it dries.
Best Materials for a Garage Shoe Rack
Powder-Coated Carbon Steel
Powder-coated tubular steel is the leading choice for most garages. The coating creates a protective layer over the steel, while the. Tubular frame gives the rack strength without making it excessively heavy.
Open wire or slatted shelves promote airflow around wet shoes.
Look for a finish that covers welds, corners, and the underside of each shelf. These areas can collect salt and water. Wipe away road salt during winter.
Since salt can damage even a good finish if it remains wet for long periods.
Heavy Wire Mesh
Heavy wire mesh provides strong ventilation and lets dirt fall away from shoes. It also works well with removable drip trays. Check that the wire is thick enough to resist bending under boots, cleats, and tool-heavy footwear.
Fine mesh can trap mud and be harder to clean. Wider slats are often easier to wipe or rinse,. But the gaps shouldn’t be so wide that small shoes tip into them.
Marine-Grade Resin
Marine-grade resin won’t rust, swell, or absorb water like wood-based panels. It’s a useful option in a damp garage or near a utility sink. It also tends to be easy to wash.
Check the load rating and frame design before choosing resin. Some light plastic racks are fine for running shoes but can bend under several pairs of wet work boots.
Materials to Avoid
Particleboard and MDF are poor choices for a damp garage. Their edges absorb water, then swell and break down. Laminate can delay the damage, but seams and screw holes remain weak points.
Untreated wood can absorb moisture, develop mold, and hold odors. Chrome-plated steel may look attractive, but chipped plating can expose the metal underneath. Bare steel can rust quickly in a garage with wet boots and road salt.
Aluminum resists rust better, but thin aluminum can bend, and its surface can pit in salty conditions.
Rack Types for Garage Entry Areas
| Garage Shoe Rack Type | Material & Weather Resistance | Boot Clearance & Capacity | Best Garage Transition Use |
|---|---|---|---|
| Heavy-Duty Slatted Steel Rack | Powder-coated tubular carbon steel / plastic drip tray | 14 to 16″ boot clearance (12 to 18 pairs) | Muddy work boots, snow muck boots, sports cleats |
| Wall-Mounted Floating Shoe Rack | Welded heavy tubular steel / lag stud mounting | 12″ vertical spacing (8 to 12 pairs) | Garages where the concrete floor is washed down with hoses |
| Inverted Boot Drying Tree | Heavy-gauge steel base / vertical tubular pegs | 6 to 8 pairs tall work boots | Fast overnight drying of soaked boots and keeping spiders out |
Freestanding Slatted Racks
A freestanding steel rack is the easiest option for most families. You can place it beside the garage-to-house door, move it during cleaning, or add another unit later. Choose a rack with non-absorbent feet and adjustable levelers if your slab is uneven.
For daily shoes, 7 to 8 inches between shelves usually works. That spacing fits running shoes, work sneakers, sandals, and clogs. For tall boots, allow 14 to 16 inches of vertical space on the bottom level.
Measure your largest boots before ordering, including pull tabs and thick soles.
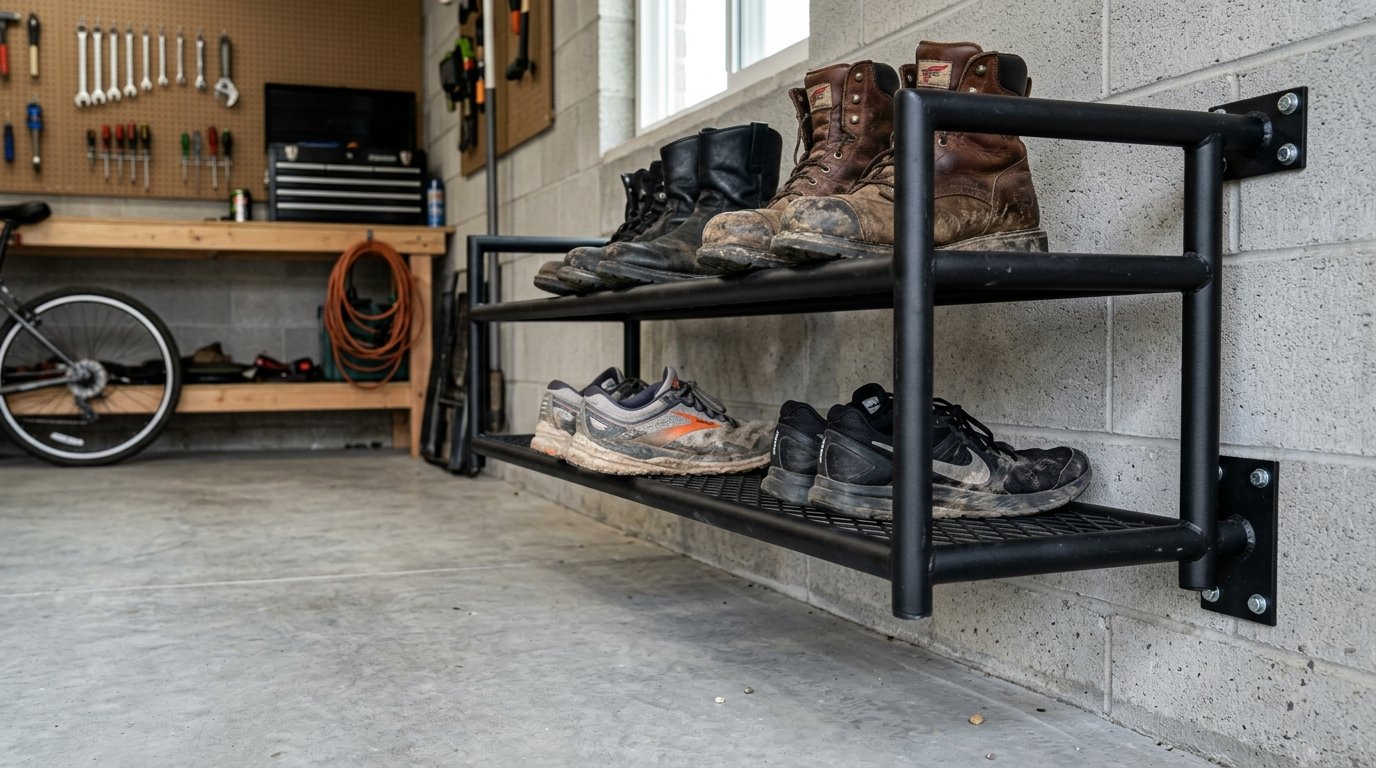
Wall-Mounted Floating Racks
A wall-mounted rack keeps footwear above wet concrete and leaves the floor open for sweeping or hosing. It also saves floor space beside a narrow entry door. This setup can be safer in homes with young children.
Or pets because the rack can be fixed firmly to wall studs.
Installation takes more work. Use lag screws or suitable anchors, and attach the rack to studs when possible. Don’t rely on drywall anchors for a loaded steel rack unless the manufacturer specifically approves them.
Check the wall surface, screw length, and total load before installation.
A wall rack has less flexibility than a freestanding model. You can’t move it easily, and the wall must support the rack plus wet footwear. It works best when you know exactly where your entry storage needs to stay.
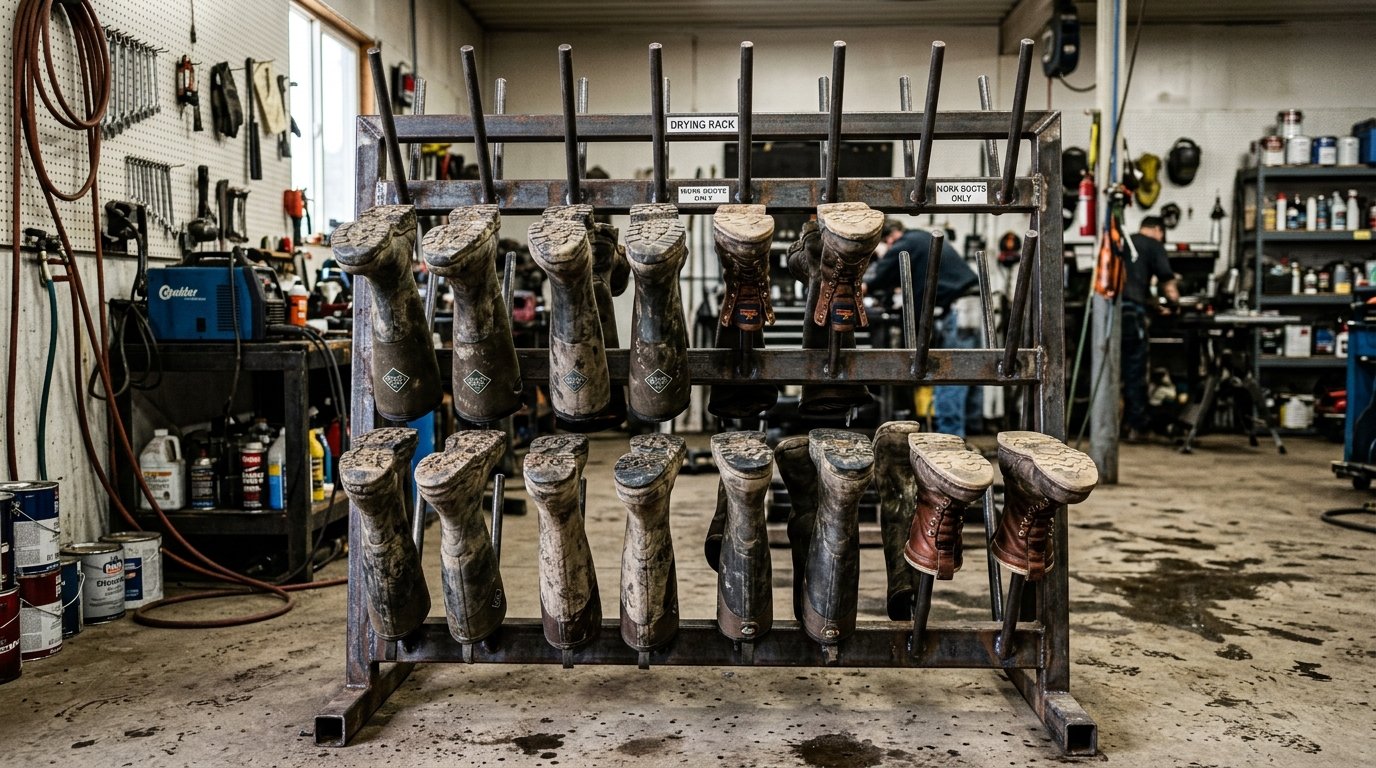
Inverted Boot Drying Trees
An inverted boot tree uses pegs to hold boots upside down. This allows air to enter the boot opening and move into the lining. Water can drain out instead of sitting in the toe box.
Upside-down storage also makes it harder for spiders and insects to settle inside boots. Choose coated metal or plastic pegs that won’t scratch the boot shaft. Leave space between each pair so air can circulate.
Ventilated Shoe Cabinets
An enclosed cabinet protects footwear from dust, bugs, and small pests. It can look cleaner beside a finished entry area, but ventilation is essential. Doors with vents or mesh panels help release moisture and reduce odors.
Don’t place wet boots in a sealed cabinet. Let them drain and dry first, or choose an open rack for wet footwear. A cabinet is better for dry shoes and seasonal storage than for fresh snow boots.
How Much Capacity Do You Need?
Measure the wall or floor area before you shop. Common rack widths range from 30 to 48 inches. A 30-inch unit may hold around 12 pairs, while a 48-inch unit.
May hold 18 to 24 pairs, depending on shoe size and shelf depth.
Capacity figures can be optimistic. Large work boots take more room than low running shoes. If your family has several pairs of boots, count each.
Boot as more than half a pair when checking shelf space.
Leave a small gap beside the rack so shoes don’t press against the wall or garage trim. Keep the entry path clear, and make sure a vehicle door, house door, or storage cabinet won’t strike the rack.
If you’re considering a seat with shoe storage, review this shoe rack bench guide before buying. A bench must support people sitting down as well as the shoes stored below it.
Features That Make a Rack Easier to Use
Removable Drip Trays
Drip trays catch melting snow, mud, and water before they spread across the garage. Plastic trays are light, washable, and less likely to rust. Pick a tray that slides out fully, since a shallow fixed tray can be difficult to clean.
Check the tray width and lip height. A low edge may let slush run onto the floor. A tall edge can hold more water but may make it harder to slide boots in and out.
Raised Feet and Levelers
Feet should lift the rack above the slab. Even a small gap helps with cleaning and air movement. Adjustable levelers are useful on cracked or sloped garage floors because they reduce wobble.
Rubber or resin feet protect the floor and resist water. Avoid absorbent felt pads, which can stay wet and hold grit against the concrete.
Open Airflow
Slatted shelves dry shoes faster than solid shelves because air can reach the soles and sides. Keep shoes spaced apart instead of pushing pairs tightly together. Remove insoles from soaked shoes and dry them separately.
Stable Construction
Look for welded joints, secure shelf supports, and a stated load rating. A rack shouldn’t rock when you place a heavy boot on one side. Anti-tip hardware is useful for tall units, especially near children and pets.
For more detail on steel thickness, shelf depth, and tier sizing, read this metal shoe rack guide.
Wall-Mounted or Freestanding?
Wall-mounted racks make sense when floor space is tight, the slab gets washed often,. Or you want fast access for cleaning. They keep footwear away from puddles and create a cleaner floor line.
They also require accurate installation and a suitable wall.
Freestanding racks work well for renters, changing households, and larger shoe collections. You can move them, replace them, or position them under a shelf. Their main weakness is floor contact, so raised feet and a drip tray matter.
For a narrow garage entry, choose wall-mounted storage if the wall can carry the load. For a larger garage with changing storage needs, choose a freestanding steel rack. Either type can work well when it keeps shoes dry, stable, and easy to clean.
Keeping Shoes Dry and Mold-Free
Don’t put wet footwear straight into an enclosed cabinet. Shake off mud outside, remove loose inserts, and place wet shoes on an open shelf or boot tree. Position the rack away from a wall corner where air movement is poor.
Use a fan during long wet periods, but keep electrical cords away from standing water. If your garage has serious humidity problems, check for leaks, improve ventilation, and consider a dehumidifier designed for the space.
Clean salt residue before it dries into a hard crust. Wipe steel frames with a damp cloth, then dry them. Wash plastic trays outside and let them dry before returning them to the rack.
Garage Safety and Placement
Keep the rack out of the vehicle’s turning path and away from garage door tracks. Don’t block electrical panels, gas appliances, fire extinguishers, or exits. Store fuel, paints, and chemicals separately from footwear and fabric items.
Heavy racks should sit on a level surface. Tall units may need anti-tip straps, especially when shelves are loaded unevenly. Place heavier boots on lower tiers to reduce the chance of tipping.
For storage layout and workplace handling guidance, see the Material Handling Institute technical standards. You can also review the OSHA material storage safety standards for basic rules on stable storage. And clear access routes.
Frequently Asked Questions
What is the best material for a shoe rack in an unheated garage?
Powder-coated tubular steel, heavy wire mesh, and marine-grade resin are strong choices. They handle temperature changes and moisture better than particleboard, MDF, and untreated wood. Powder-coated steel provides good strength, while resin won’t rust.
Choose a design with open shelves and raised feet so wet shoes can dry.
How do I keep shoes from getting moldy on a cold garage floor?
Raise the rack 2 to 4 inches above the slab with non-absorbent feet, or mount it to the wall. Use a removable drip tray for melting snow and keep space around each pair for airflow. Dry wet footwear before putting it in an enclosed cabinet.
A boot tree can help drain and dry tall boots faster.
What features should I look for in a garage shoe rack for work boots?
Look for 14 to 16 inches of lower-tier clearance, a powder-coated steel frame, open slats, raised feet,. And a washable drip tray. Inverted pegs are useful for rubber boots, hunting boots, and work boots that get soaked.
Check the rack’s load rating and measure your largest pair before ordering.
Are wall-mounted garage shoe racks better than freestanding racks?
Wall-mounted racks are better for small spaces, wet floors, and garages that are washed with a hose. They keep footwear off the slab and make floor cleaning easier. Freestanding racks are easier to install, move, and expand.
Choose based on wall strength, floor space, cleaning routines, and the size of your shoe collection.
Final Buying Checklist
- Choose powder-coated steel, heavy wire mesh, or marine-grade resin.
- Avoid particleboard, MDF, and untreated wood in damp garages.
- Allow 7 to 8 inches for everyday shoes.
- Allow 14 to 16 inches for tall boots and muck boots.
- Use a removable plastic drip tray for snow, mud, and water.
- Raise the rack above the concrete slab with durable feet.
- Choose wall mounting when floor washing and space are major concerns.
- Use inverted pegs when fast boot drying matters.
- Check the width, shelf depth, load rating, and wall hardware.
- Keep the rack clear of doors, vehicles, exits, and electrical equipment.
The best shoe rack for a garage is built for wet, dirty, changing conditions. A raised steel rack with open shelves and a washable tray will suit most homes. Add tall boot clearance when you use work boots or muck boots,.
And choose wall mounting when keeping the slab open and dry is your main priority.

Callum Langham
Founder & Technical Storage Editor
Callum Langham is the founder and technical editor of Rack System. With over 12 years of hands-on field experience in warehouse logistics, garage organization, and industrial storage installations, Callum specializes in engineering safety standards, beam load calculations, and OSHA/RMI compliance. Every guide on Rack System is audited against verified steel gauge tolerances and municipal building codes.