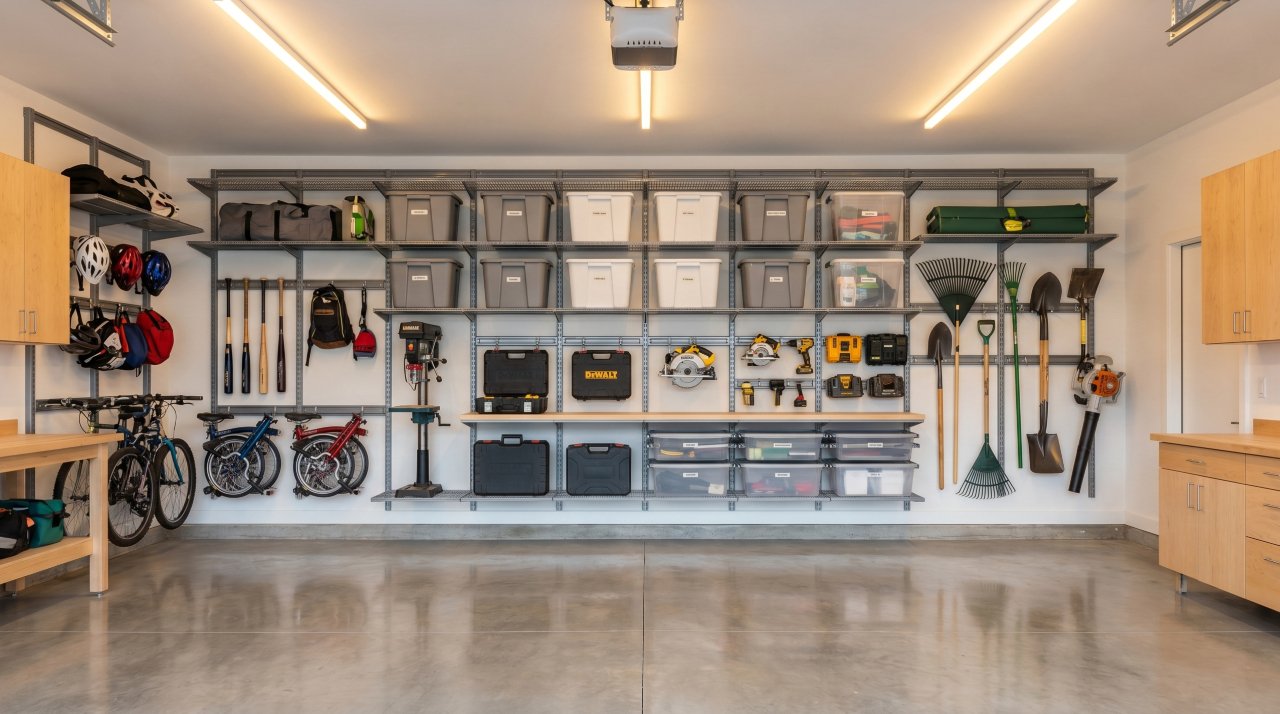
The average American garage holds over $3,800 worth of tools and equipment — yet 25% of homeowners say they can’t even park a car in there. Wall mounted garage shelving changes that equation completely, turning wasted vertical space into organized, accessible storage.
If you’re trying to figure out what wall mounted garage shelving actually is, how it works, and whether it’s right for your garage, you’re in the right place. By the end of this guide, you’ll know the different system types, weight limits, costs, installation basics, and the mistakes most beginners make before spending a dollar.
This isn’t a product list. It’s a real, working knowledge base built for anyone who’s new to garage organization.
What Is Wall Mounted Garage Shelving?
Wall mounted garage shelving is any storage shelf system that attaches directly to your garage walls rather than standing on the floor. The shelves get their support from the wall itself — either through wall studs, concrete anchors, or heavy-duty mounting hardware.
The core idea is simple: move storage off the floor and onto the walls. This frees up valuable floor space for your car, workbench, or workspace.
Unlike freestanding shelving units, wall mounted systems don’t tip over, don’t take up floor footprint, and don’t shift around when you load them heavily. They’re fixed, stable, and purpose-built for garages.
Why Homeowners Choose Wall Mounted Systems
Floor space in a typical two-car garage runs about 400 square feet. Every shelving unit on the floor eats into that. Wall mounted shelving uses the roughly 8–10 feet of vertical wall height most garages offer, which most people never use.
There’s also a safety benefit. Freestanding shelves can tip if loaded unevenly or bumped by a car door. Wall-anchored systems stay put, which matters when you’re storing heavy items like paint cans, power tools, or seasonal gear.
You also gain flexibility. Most wall mounted systems let you adjust shelf height over time as your storage needs change. That adaptability is something fixed furniture can’t offer.
The Main Types of Wall Mounted Garage Shelving
Not all wall mounted shelving works the same way. Here are the four main systems you’ll encounter:
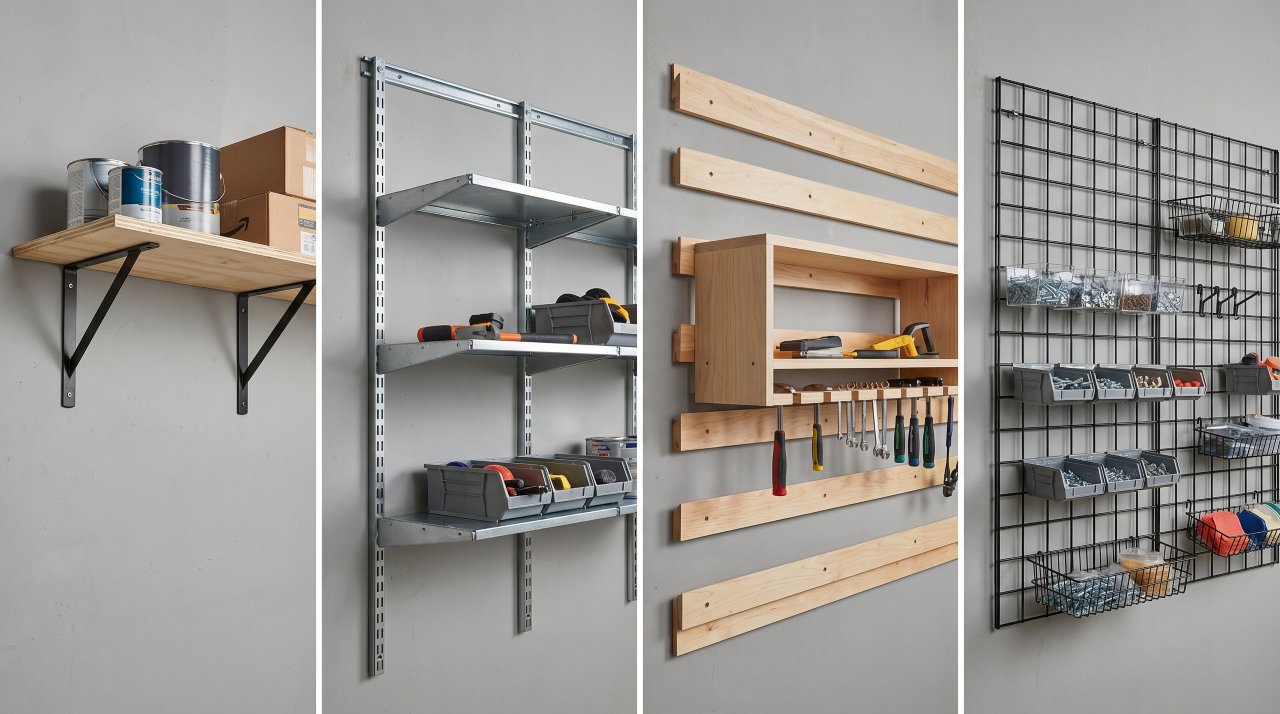
1. Fixed Bracket Shelving
This is the most basic type. L-shaped metal brackets bolt into wall studs, and a shelf board (wood or metal) rests on top. It’s affordable, simple to install, and strong when done correctly. Expect to pay $5–$15 per bracket.
2. Track and Rail Systems (Slotted Wall Channels)
Vertical metal channels screw into the wall, and horizontal brackets click into those channels at any height. You can reposition shelves without removing hardware. These systems are popular because of their flexibility and clean look. Most cost $30–$80 per linear foot installed.
3. French Cleat Systems
A French cleat uses a 45-degree angled board (or metal strip) mounted to the wall. Matching angled hooks hang from it and hold shelves, bins, or tools. It’s one of the most flexible garage storage systems available, and a favorite among serious DIYers.
4. Steel Wire Grid Panels
Wire grid panels bolt to walls and let you attach wire shelves, hooks, and bins in almost any arrangement. They’re lightweight, affordable, and easy to reconfigure. They don’t handle extremely heavy loads as well as solid bracket systems, though.
For a broader look at your storage options, check out this guide on rack system types, uses, and how to choose to compare wall-mounted options against freestanding alternatives.
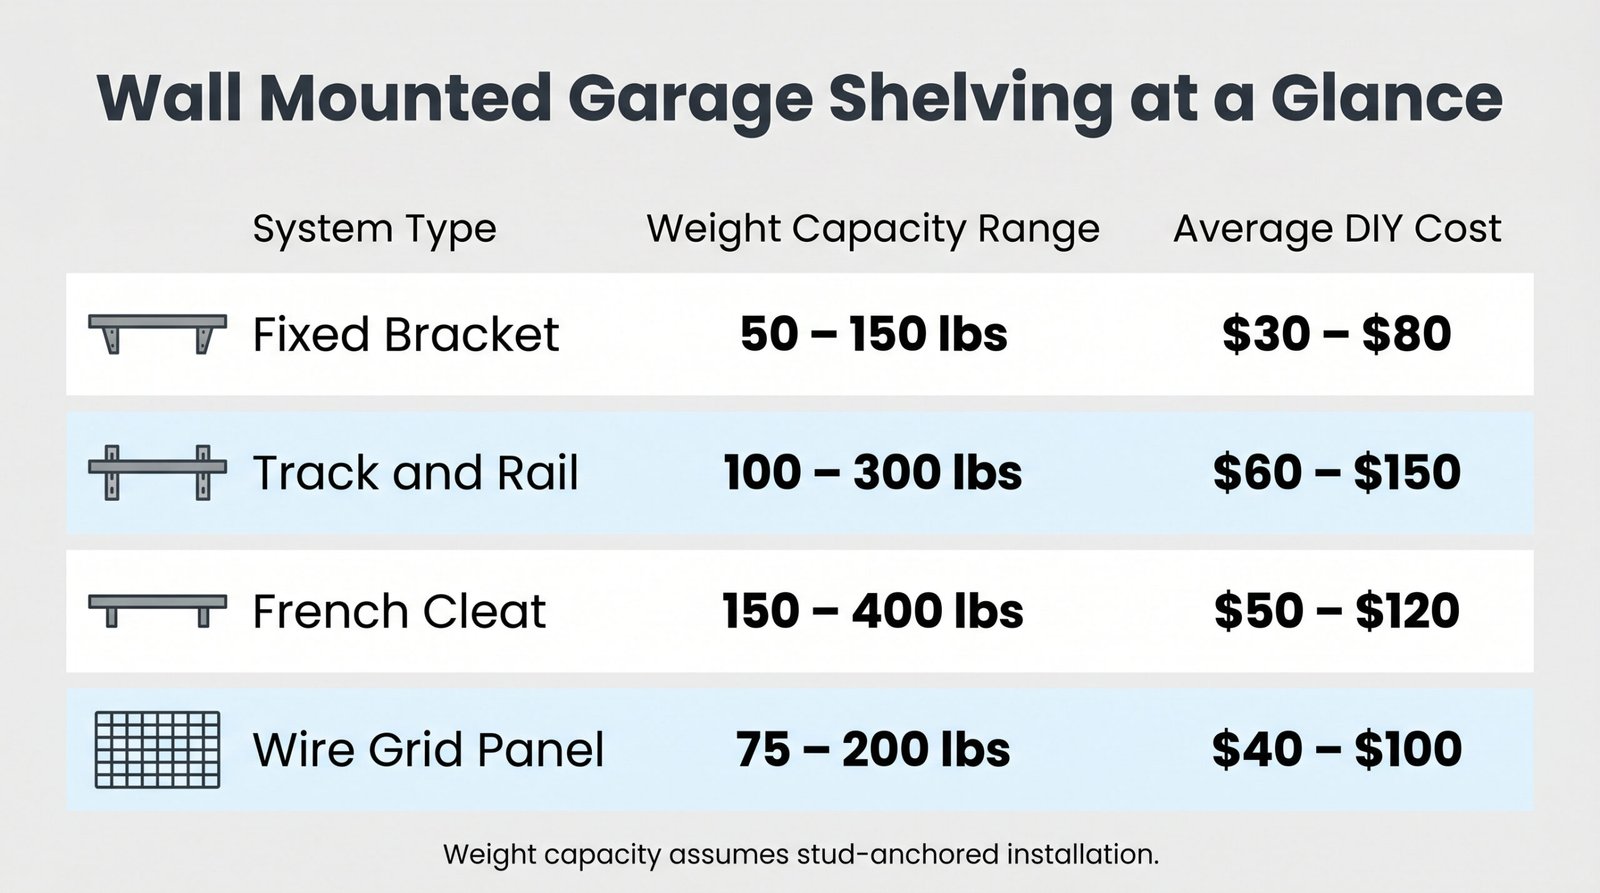
How Much Weight Can These Shelves Hold?
Weight capacity is the most important spec most beginners overlook. Overloading a shelf doesn’t just damage the shelf — it can pull hardware out of the wall, dropping everything onto your car, your floor, or you.
Here’s a general breakdown:
| Shelving Type | Typical Weight Capacity |
|---|---|
| Fixed bracket (per shelf) | 50–200 lbs depending on bracket strength and stud attachment |
| Track and rail system (per shelf) | 100–350 lbs when anchored into studs |
| French cleat (per section) | 50–300 lbs depending on cleat depth and wood grade |
| Steel wire grid panels | 30–100 lbs per shelf section |
These numbers assume you’re anchoring into wall studs, not just drywall. Drywall alone can’t support meaningful weight over time. According to OSHA shelf load safety standards, all shelving should be clearly rated for its maximum intended load, and users should never exceed that rating.
Wall Types Matter — A Lot
Your wall material determines what kind of mounting hardware you’ll need. This is where many beginners get stuck or make costly mistakes.
Drywall over wood studs: This is the most common garage wall setup in US homes. You mount into the studs (typically 16 or 24 inches apart) using lag bolts or wood screws. The studs carry the weight — not the drywall itself.
Concrete or cinder block walls: Common in older garages and basements. You’ll need a hammer drill and concrete anchors (also called masonry anchors or sleeve anchors). It’s a slightly more involved process, but concrete walls are extremely strong once properly anchored.
OSB or plywood-lined walls: Some garage walls are covered in oriented strand board or plywood sheeting instead of drywall. These surfaces let you mount shelves almost anywhere without hunting for studs, making them the most forgiving wall type for DIY installs.
Before you buy anything, check your wall type and pick the right fasteners for it. The resource on choosing the right drywall anchors from Family Handyman covers the differences clearly.
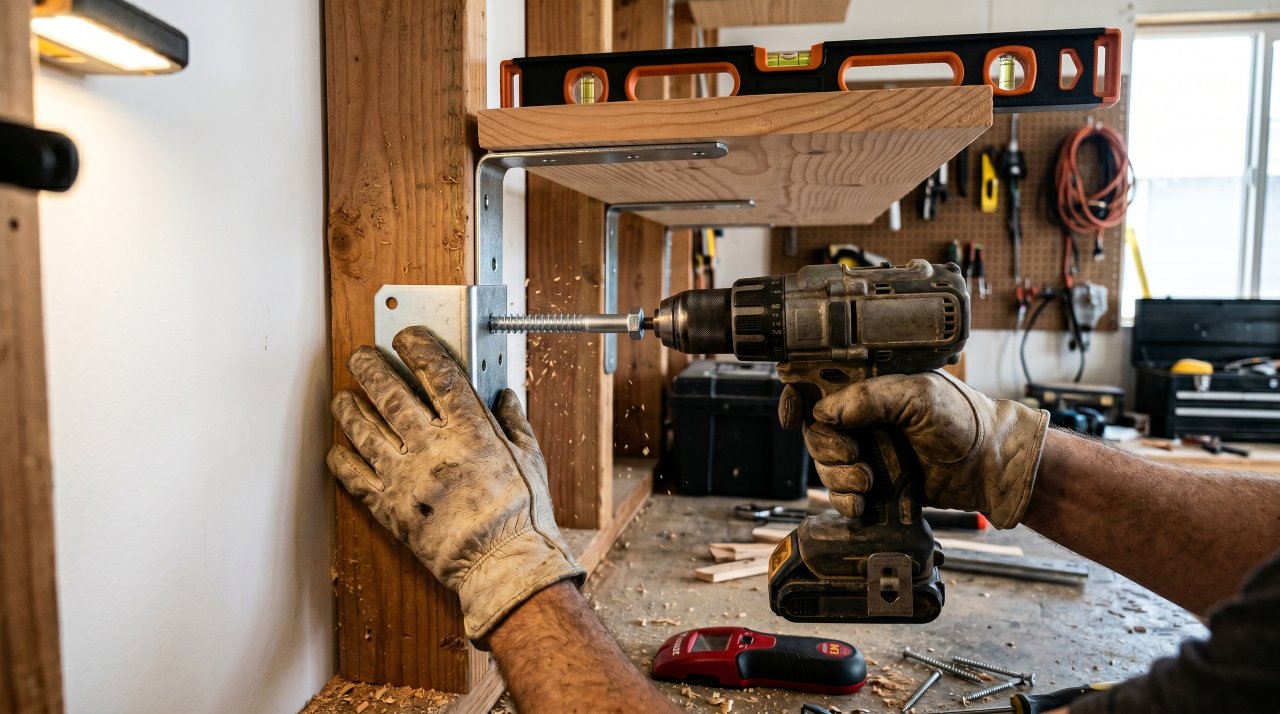
How to Install Wall Mounted Garage Shelving
Installation doesn’t have to be complicated. Here’s what the process looks like for a standard fixed bracket shelf on a drywall/stud wall.
Step 1: Find your studs. Use a stud finder, or knock on the wall and listen for a solid thud instead of a hollow sound. Mark each stud location with tape. Learning how to locate wall studs accurately before you start saves you from mounting into empty drywall.
Step 2: Mark your shelf height. Decide how high you want your lowest shelf. A common starting height is 18–24 inches from the floor, which keeps items above car hood level. Mark a level line across the wall.
Step 3: Pre-drill and mount brackets. Hold each bracket to the wall at your marked height, aligned with a stud. Pre-drill a pilot hole, then drive lag bolts through the bracket and into the stud. Don’t overtighten — you want snug, not stripped.
Step 4: Attach the shelf board. Rest your shelf on the brackets. For wood shelves, drive screws up through the bracket’s lip into the underside of the board. For metal shelves, follow the manufacturer’s specific instructions.
Step 5: Check and test. Use a level to confirm the shelf is straight. Apply gradual weight — don’t slam a full load on it immediately. Give the hardware time to seat properly.
A standard two-shelf bracket installation on one wall takes most beginners 2–3 hours, including planning time.
What Does Wall Mounted Garage Shelving Cost?
Cost varies widely depending on system type, materials, and whether you hire it out or do it yourself.
DIY fixed bracket shelving is the most budget-friendly option, often running $50–$150 for a full wall section using lumber and hardware-store brackets. Track and rail systems cost more upfront — typically $150–$400 for a single wall — but offer better long-term flexibility.
Professional installation adds labor costs of $50–$100 per hour depending on your region. For a basic single-wall setup, most installers complete the job in 2–4 hours.
Premium systems from brands carried at home improvement stores can run $300–$700+ for a complete wall, especially if they include panels, hooks, and accessories. For independent ratings and comparisons, Consumer Reports garage storage ratings offer unbiased assessments that help you decide what’s worth the price.
Common Beginner Mistakes to Avoid
Even a simple wall-mounted shelf can go wrong without some basic awareness. Here are the mistakes that show up most often:
Mounting into drywall only. This is the number one error. Drywall anchors alone won’t hold a loaded shelf long-term. Always go into studs for anything holding more than 20 pounds.
Ignoring level lines. A shelf that looks close enough to level almost never is. Use a 4-foot spirit level or a laser level — don’t trust your eye.
Underestimating total load. People calculate the weight of what they plan to store now. They don’t account for what gets added over the next year. Plan for 25–30% more capacity than you think you need.
Choosing the wrong spacing. Shelves set 12 inches apart don’t fit most bins or boxes. Standard shelf spacing in garages runs 18–24 inches vertically to accommodate common storage containers.
Skipping pilot holes. Driving large screws into wood studs without pilot holes often splits the wood or strips the screw head. Always pre-drill.
Standard Heights and Spacing Recommendations
There’s no single “correct” height for garage shelves, but there are proven starting points that work for most garages.
The lowest shelf should clear your car hood or vehicle roofline by a few inches if it runs above a parking bay. That typically puts the first shelf at 60–72 inches from the floor on a parking wall. On a non-parking wall, you can start much lower — 18–24 inches — and use that space to store frequently accessed items.
Vertical spacing of 18–24 inches between shelves works for most standard bins, boxes, and containers. Leave one section with 30–36 inch spacing if you plan to store tall items like seasonal decorations or large power tool cases.
Don’t forget clearance from the ceiling. Leave at least 6–12 inches between your top shelf and the ceiling to make loading and unloading practical.
The Honest Downsides of Wall Mounted Shelving
Wall mounted shelving isn’t perfect for every situation, and you deserve a straight answer on its limitations.
Installation takes real effort, especially on concrete walls or in older homes with irregular stud spacing. If you’re not comfortable with a drill and basic hardware, the job will take longer and feel more stressful than expected.
Wall-mounted systems also commit you to a location. Unlike a rolling shelf unit you can push to a different corner, wall-mounted shelves leave holes when you remove them. Plan your layout thoughtfully before you start drilling.
Finally, wall mounted shelving doesn’t work well for extremely heavy loads without proper reinforcement. If you’re storing engine blocks, large machinery, or significant bulk materials, you may need a freestanding industrial rack instead. Know your weight limits and stay within them.
Choosing the Right System for Your Garage
Making the right choice comes down to three questions: What are you storing? How heavy is it? How often does your storage need to change?
If you’re storing seasonal items, lighter bins, and tools, a track-and-rail or French cleat system gives you the flexibility to adapt as needs change. If you’re storing fixed, heavy loads that won’t move much — like bulk supplies or sporting equipment — fixed bracket shelving at high weight ratings makes more sense.
Concrete walls? Plan for masonry anchors and a hammer drill. Drywall and studs? A standard drill and lag bolts will handle most systems. OSB-covered walls? You have the most freedom to mount wherever you like.
FAQ — People Also Ask
What is the best wall-mounted shelving for a garage?
The best system depends on your wall type, weight needs, and budget. Track-and-rail systems with heavy-duty brackets offer the best combination of flexibility and load capacity for most homeowners. Fixed bracket shelving is the most affordable option for simpler setups.
How much weight can wall-mounted garage shelves hold?
Weight capacity ranges from 30 lbs per shelf for basic wire grid panels to 350 lbs per shelf for heavy-duty track-and-rail systems anchored into studs. Always check the manufacturer’s rated capacity before loading shelves, and never exceed it.
What is the standard height for garage shelves?
On a parking wall, most homeowners start their lowest shelf at 60–72 inches to clear the car roof. On non-parking walls, shelves can start at 18–24 inches from the floor. Vertical spacing between shelves typically runs 18–24 inches to fit standard storage bins.
Are floating shelves good for garages?
Floating shelves work in garages for lighter decorative or storage use, but they’re not ideal for heavy loads or tools. They’re better suited to indoor spaces. For a working garage, bracket-mounted or track-rail systems offer far better load support and durability.
How do I install wall-mounted shelving in my garage?
Find your studs, mark a level line at your desired shelf height, mount brackets into studs using lag bolts, attach your shelf board, and test gradually with weight. The full process takes most beginners 2–3 hours per shelf section.
What type of shelving is best for a garage?
Wall mounted shelving is one of the top choices because it frees up floor space and uses vertical wall height most garages waste. Within wall-mounted systems, track-and-rail and French cleat setups are the most versatile, while fixed bracket systems offer the strongest load ratings per dollar spent.
Your Next Step in Garage Organization
Wall mounted garage shelving is one of the most practical upgrades you can make to your garage. You gain usable floor space, better organization, and a safer storage setup — all without a major renovation.
The single most important takeaway from this guide: match your shelving system to your wall type and weight needs before you buy anything. That one decision determines everything else — the hardware, the cost, the installation process, and how long it lasts.
Start by walking your garage and noting your wall material, identifying what you need to store, and estimating the total weight. Then pick a system that fits those answers. Once you know the basics, explore how to organize your garage for a full layout strategy that makes the most of every system you install.
You’ve got everything you need to make a confident, informed decision. Go measure that wall.
